Monday, July 4, 2011

vanilla cake with chocolate cheesecake filling and strawberry cheesecake frosting

I love birthdays.  I love celebrating someone.  I love buying thoughtful gifts.  I love how excited people get when you do nice things for them. I love to think about that person, and what they would like most on their one day that's about them.

Usually, that's in baked good form.

This year, I returned the favor. To myself.


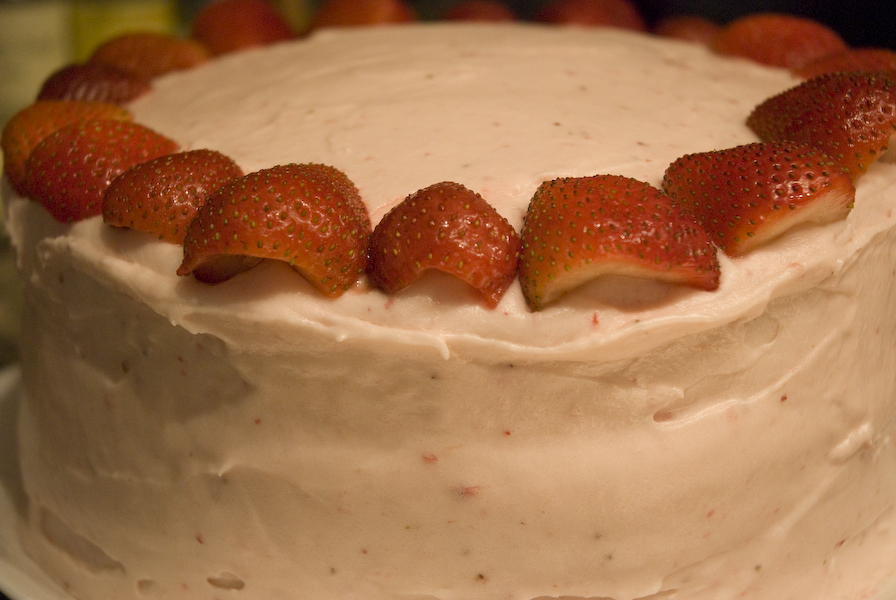
Hello, pretty.  You are my ultimate dessert.  You take everything that I love in sweets and package it up quite nicely.  You're easy on the eyes.  And my taste buds.


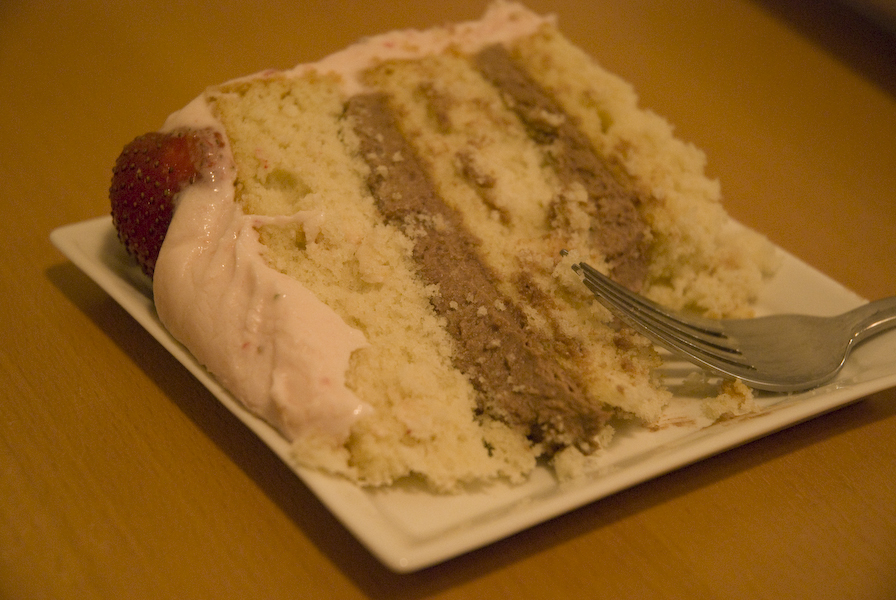
You are...a vanilla cake, filled with a chocolate cheesecake frosting. And topped with fresh strawberry cheesecake frosting.


I love you.


I had so much fun baking this cake.  It took me days to figure out exactly what I wanted.  


It had to be cake.  Duh.


It had to be vanilla cake.  No other form of cake is superior in my opinion.


I wanted something kind of fruity and not too rich.  It's summer.  Enter strawberry.


But then I had a serious problem: how do I incorporate chocolate?  I like a little chocolate, but not a lot.  Buttercream?  Too boring.  Then I saw this.  A gift from the heavens Jessica.


So call it a neapolitan cake.  Call it whatever you like.  Regardless, this cake was in.cred.i.ble.


Yeah.


Oh, and I can't forget to give huuuuge credit to my blog's biggest fan, Morgan Morrone, for all of the awesome photos! She's a sneaky talent who snapped all of those action and close-ups while I'm wrist-deep in frosting. Thanks, bud.

Vanilla cake with chocolate cheesecake filling and strawberry cheesecake frosting
cake recipe from Baked; chocolate filling from How Sweet It Is; strawberry frosting from yours truly


for the cake:
2 1/2 cups of cake flour
3/4 cup all-purpose flour
1 tablespoon baking powder
1 teaspoon baking soda
3/4 teaspoon salt
1/2 cup (1 stick) unsalted butter, softened
1/2 cup vegetable shortening
1 3/4 cups sugar
1 tablespoon pure vanilla extract
1 large egg
1 1/2 cups ice cold water
3 large egg whites, at room temperature
1/4 teaspoon cream of tartar

  1. Preheat the over the 325 degrees F. 
  2. Butter three 8-inch round cake pans, line the bottoms with parchment paper, and butter the parchment. Dust pans with flour and set aside.
  3. In a large bowl, sift together flours, baking powder, baking soda, and salt. Set aside.
  4. In the bowl of an electric mixer fitted with the paddle attachment, beat the butter and shortening on medium speed until creamy, about 3 to 4 minutes. 
  5. Once creamy, keep beating and gently pour in sugar and vanilla and continue to beat on medium speed until fluffy, about 3 minutes. Scrape sides of bowl to ensure all sugar is mixed.
  6. Continue beating and add the egg until well incorporated. Turn the mixer to low. Add the flour mixture, alternating with the ice water, in three separate additions, beginning and ending with the flour mixture. Scrape down the bowl, then mix on low speed for a few more seconds.
  7. Meanwhile, whisk the egg whites and cream of tartar until soft peaks form in a medium bowl, careful not to overbeat. Gently fold the egg whites into the batter.
  8. Divide the batter among the prepared pans and smooth the tops. Bake for 40 to 45 minutes, rotating the pans about 20 minutes into the baking time. Once a toothpick inserted in the middle comes out clean, remove and transfer cakes to a wire rack and let cool for 20 minutes. Invert the cakes onto the rack, remove the pans, and let cool completely. Remove the parchment.
for the chocolate cheesecake filling:
1/2 cup butter, softened
8 ounces cream cheese, softened
4 1/2 cups powdered sugar
1/3 cup good quality unsweetened cocoa powder
1 tablespoon vanilla extract

  1. In the bowl of an electric mixer, beat the butter and cream cheese together on medium speed until smooth. 
  2. Turn the mixer to low speed, and gently pour in vanilla.  Slowly add the powdered sugar and cocoa powder, scraping sides of bowl to ensure all ingredients are fully incorporated.
for the strawberry cheesecake frosting:
1 quart strawberries
5 1/2 cups powdered sugar
8 ounces cream cheese, softened
1/2 cup butter, softened
1 tablespoon vanilla extract
  1. Place strawberries in food processor and puree until smooth.  Set aside.
  2. In the bowl of an electric mixer, beat the butter and cream cheese together on medium speed until smooth.
  3. Turn the mixer to low, and gently pour in vanilla and strawberry puree and mix until well incorporated.
  4. Keeping mixer on low, gently pour in powdered sugar, one cup at a time, until frosting becomes creamy and somewhat thick, or until desired consistency is attained.


Friday, June 24, 2011

whole wheat banana peanut butter bread


Fact: I love bananas.  Put that sucker on a piece of toast, in a protein shake, in candy...I'm happy.  Make bread out of it?  Make carbohydrates even more appealing?  Send it this way, please.


I may very well secretly hope that my bananas go bad so that I can turn them into banana bread.  Or at least, I wish this upon everyone else's.  Mine never make it that long in my house.  So when I found four overly-ripe bananas in my sister's house this week, I had a mission.  


I've been coveting certain recipes for a long time, and this was one.  Flour has some amazing recipes, and even though I hardly followed this, I definitely used it as a guide.  Of course I added a million more spices.  And of course I only used whole wheat flour.  But I also threw in some peanut butter.

What?  Peanut butter?

Come on, don't tell me you don't throw some of this on your banana slices and eat it standing up in your kitchen.

I think I've said too much.


Whole Wheat Banana Peanut Butter Bread
adapted slightly from Chef Joanne Chang of Flour Bakery

1 2/3 cups whole wheat flour
1 teaspoon baking soda
1 teaspoon ground cinnamon

1/2 teaspoon ground nutmeg
1/2 teaspoon ground cardamom
1/4 teaspoon ground allspice
1/4 teaspoon ground cloves
1/2 teaspoon salt
1/2 cup granulated sugar
1/2 cup brown sugar
2 eggs
2/3 cup canola oil
4 large very ripe bananas, mashed
2 tablespoons vanilla yogurt (I used Dannon Light & Fit)
1/3 cup creamy peanut butter
1 teaspoon vanilla extract

for crumble:
1/2 cup old-fashioned oats
3 tablespoons butter, melted
1/3 cup brown sugar
3 tablespoons whole wheat flour
  1. Set oven to 350 degrees F. Grease and flour two loaf pans and set aside.
  2. In a medium bowl, sift together the flour, baking soda, cinnamon, spices, and salt. 
  3. In a large bowl, beat sugar and eggs with a whisk until light and fluffy, about 10 minutes. Gently pour in oil and mix until well combined. 
  4. In a small bowl, mix together peanut butter, mashed bananas, yogurt, and vanilla and stir well to incorporate. Add to sugar and egg mixture.
  5. Fold in dry ingredients, stirring in swift strokes ensuring not to overmix. Pour batter evenly among two pans.
  6. In a small bowl, mix the brown sugar, flour, and oats. Slowly pour in butter and stir until mixture has the consistency of wet sand. Sprinkle evenly over two loaves.
  7. Bake at 350 degrees for about 1 hour, until toothpick comes out clean from middle.

Friday, June 17, 2011

oatmeal chocolate chip cookies cups

I like following a schedule.  I am glued to my iPhone.  Google Calendar is like my right hand.  They even make refrigerators now with screens that have google in them so that you can keep your calendar, write notes, make grocery lists, and make your life infinitely better.  I don't know who makes it, but I will have this in my house.  Someday.

Sometimes routines are good.  Sometimes, you just cannot bake another. chocolate. chip. cookie.


So after my test batch of these oatmeal chocolate chip little fellas, I just couldn't do it.  I was bored.  So I whipped out my cupcake pan, filled them with fun little wrappers, and pressed that dough right in those things.  I wasn't sure they'd turn out well, but I was pleasantly surprised to yield this:


They're gooey, chewy, and the perfect portion.  Plus they're cute.  And that's all I ever want in my baked goods, anyways.  You know I love oatmeal, and these really aren't overly oat-y, but just add a nice chewy texture to an otherwise so-very-regular-it-makes-your-soul-die kind of cookie.


This is actually a recipe that I've been working on for a long time.  I saw shortening in a chocolate chip cookie recipe a while ago, (thanks, Chrissy!) and I was so intrigued.  I must have stared at this post for days before I tried it.  Shortening!  So bad it should be outlawed.  But it makes the softest, chewiest cookies.   My love for all things brown butter has found its match.  But I just can't choose.  Call me Sophie.


Oatmeal Chocolate Chip Cookie Cups
from yours truly
1 stick (1/2 cup) butter, unsalted, softened
1/2 cup shortening
1 cup granulated sugar
3/4 cup light brown sugar
2 eggs
1 1/4 teaspoons vanilla
2 cups plus 1 tablespoon all-purpose flour
2 teaspoons baking powder
3/4 teaspoon salt, plus more for topping
1 cup old-fashioned oats
2 cups chocolate chips
  1. Cream together butter, shortening, and sugars in large bowl until smooth.
  2. Add eggs, one at a time, mixing thoroughly between each addition.
  3. Stir in vanilla.
  4. In a separate bowl, sift together flour, salt, and baking powder.  Add flour mixture to butter in three parts, mixing together until just incorporated each time.  Do not overmix.
  5. Add oats and chocolate chips and mix to combine.
  6. Let dough chill for about an hour (or up to 24) before preheating oven to 350 degrees.
  7. Once chilled, line cupcake pans with liners and press about 1 1/2" ball of dough into cupcake mold, or enough to fill the entire cup. (Dough will not rise much.)  Lightly sprinkle tops of cookies with just a bit of kosher salt.
  8. Bake for about 12-14 minutes until outer edges are golden brown and inside no longer looks shiny and doughy.

Saturday, May 21, 2011

croissants


I was just about to pull another "this is the one recipe I've been dying to make forever" line on you, when I realized that I just did that.  Oops.  Well, consider this accomplishment one that I can justify patting myself on the shoulder.   


This recipe is the perfect solution for a rainy day, or just some random day that you'd like to devote entirely to baking.  Because these take that long.  And they require an underrated skill that I think all bakers should possess: patience.  But the end result is worth it, and these buttery, flaky little pastries are something that your guests will thank you for. Repeatedly.


Croissants


2 teaspoons active dry yeast
2 tablespoons sugar
3 tablespoons warm water
1 teaspoon salt
2 tablespoons unsalted butter, melted and cooled
1 cup cold whole milk
2 ½ cups all-purpose flour
1 cup unsalted butter
2 tablespoons all-purpose flour
1 large egg, beaten with 1 tablespoon whole milk
  1. In a small bowl, dissolve yeast and a pinch of sugar in the warm water.  Let stand until foamy, about 5 minutes.
  2. In a bowl, combine the remaining sugar, salt, melted butter, milk, yeast mixture, and ½ cup of the flour, and mix with a wooden spoon until blended.
  3. Gradually add the remaining flour ½ cup at a time and mix just until the dough comes together in a sticky mass.
  4. On a lightly floured work surface, roll out the dough into a rectangle about ½ inch thick.  Transfer to a baking sheet, cove r with plastic wrap, and refrigerate until chilled, about 40 minutes.
  5. To make the butter package, use a rolling pin to beat the butter on a work surface to flatten it and warm it to about 60 degrees F.  Sprinkle the butter with flour and gently beat the butter with the rolling pin to press the flour into the butter.  Shape the butter into a 6-by-8” rectangle.  If the butter becomes too warm, wrap and refrigerate just until firm but still pliable.
  6. Laminate the dough by rolling it out to a 9-by-13” rectangle on a lightly floured surface.  With a short side facing you, place butter on lower half, leaving ½ inch border on all sides.  Fold over the upper half to cover the butter and press edges together to seal.
  7. Roll out dough, with a folded side to the left, into a 10-by-24” rectangle.  With a short side facing you, fold the bottom third up, then fold the top third down, as if folding a letter.  Cover with plastic wrap and refrigerate for 45 minutes.
  8. Return chilled dough to lightly floured surface with folded side to the left and repeat the process to make three more turns.  After the final turn, refrigerate the dough for at least 4 hours or up to overnight.
  9. To form the croissants, roll out the pastry on a lightly floured work surface into a 9-by-18” rectangle.  Cut in half lengthwise, and then cut each half crosswise into four squares, for a total of 8 squares.  Cut each square in half on the diagonal.
  10. Lightly butter 2 baking sheets.  Working with one triangle at a time, gently stretch each triangle to about twice its original length.  Then, gently stretch the wide end of the triangle.  Lay the triangle on the work surface with the point facing you.  Place your hands at the top on the wide end and gently roll the pastry toward you.  Just before you get to the end, smear the tip against the work surface with your thumb.  Continue to roll until the tip is on the underside.
  11. Place, tip side down, on a prepared pan.  Turn the ends in slightly toward the center.  Repeat with remaining triangles, spacing them about 3” apart.  Place in a warm, draft-free area, cover loosely with a  kitchen towel, and let pastries rise until they double in size, about 1 ½ hours.
  12. Position rack in the middle of the oven, and preheat to 425 degrees F.
  13. Lightly brush the tops of the pastries with the egg mixture.  Bake pastries one sheet at a time, until golden brown, about 15-18 minutes.
  14. Transfer to a wire rack and let ool on the pan.  Serve warm or at room temperature.  Store in an airtight container at room temperature for up to one day.

Wednesday, May 18, 2011

red velvet chocolate chip cookies


Red velvet.  Yeah, that's right.  Red velvet cookies.  I have to admit, I'm not a chocolate cookie fan, but these exceeded my expectations.  Just chocolate-y enough, and semi-cake-like for just the right texture.  I first saw these on my favorite blog, How Sweet It Is, a while ago, but just had the guts to try them last week.  If you're in the mood for a new take on the classic CCC recipe, I'd highly recommend this recipe.


The only modifications I made were replacing most of the flour with cake flour in order to make the cookies a bit more cake-like and soft.  I'm a big fan of soft, chewy cookies, and these seemed to compliment its cake ancestor nicely.  I love the cracks that all of the baking soda makes in them, too!


Red Velvet Chocolate Chip Cookies

recipe adapted from Jessica at How Sweet It Is

1/2 cup (1 stick) unsalted butter
1/2 cup granulated white sugar
1/2 cup brown sugar
1 egg
1 teaspoon vanilla extract
1 cup cake flour
1/2 cup all purpose flour
1 teaspoon baking soda
1/4 teaspoon baking powder
1/4 teaspoon salt
1/3 cup cocoa powder
1 teaspoon red food coloring
1/2 cup Ghirardelli 60% cacao chocolate chips

  1. Preheat oven to 375.
  2. Cream butter and sugars together until fluffy. 
  3. Add egg and vanilla and combine until smooth. 
  4. Beat in red food coloring. 
  5. Stir in cocoa, flour, baking soda and salt until just combined. 
  6. Fold in chocolate chips. 
  7. Scoop out dough into 1-2 tablespoon balls and set on baking sheet. 
  8. Bake for 10-12 minutes until middle begins to crack a little.

Monday, May 16, 2011

apple spice cake

So, there once was a recipe of Dorie Greenspan's...something I've been eyeing for quite some time.


But I had a few problems with it.  I can never just leave a recipe alone.  

Hello, my name is Melissa, and I'm a control freak.  

Hello Melissa.

This cake was no different.  It calls for dark rum.  Rum, Dorie? Really?  There's no way I'd have that in stock, and certainly an even slimmer chance that I'm buying a whole fifth just for the three tablespoons the recipe calls for.  So instead, I upped the vanilla and threw in some almond.  Who doesn't love almond extract, anyways?  And if you ask me, you can really never have enough vanilla.

I didn't stop there.  I noticed that Dorie just wants you to simply "melt" your butter.  Oh, no you di-in't, Dorie.  Are you kidding me?  You really don't want to enhance the apple flavor with the nuttiness of browned butter?  Well, I do.  Sorry.  [Actually, I'm not. This was delicious.]


Oh, but there's just one more thing.  I swear.  You may be the next Julia Child, Ms. Greenspan, but let it be known: I won't fall for your tricks.  Are you really trying to tell me that an apple cake can be delicious without cinnamon?  I don't believe you.  

Enter cinnamon.  

And...that cardamom I bought last week that I've been dying to use.  

Oh, yeah, and if I have cinnamon, I have to add nutmeg.  I can't have one without the other.  (I think this is what they call a compulsion.)

And then there's those ground cloves that I love.  And allspice!  Gotta have allspice if I'm calling it a spice cake.

But that's it.  I swear.  I mean no disrespect, ma'am.

Other than these couple of things, Dorie my dear, I think you I have yourmyself a winning cake here.


Apple Spice Cake

3/4 cup all-purpose flour
3/4 teaspoon baking powder
Pinch of salt
2 cups apples, peeled and chopped into 1" chunks (about 3 large apples)
2 large eggs
3/4 cup sugar
1 teaspoon pure vanilla extract
1/2 teaspoon almond extract
3/4 teaspoon cinnamon
1/2 teaspoon cardamom
1/4 teaspoon freshly ground nutmeg
1/4 teaspoon ground cloves
1/4 teaspoon allspice
8 tablespoons (1 stick) unsalted butter, browned and cooled
  1. Center a rack in the oven and preheat the oven to 350 degrees F. Generously butter an 8-inch springform pan and put it on a baking sheet lined with a silicone baking mat or parchment paper and put the springform on it.
  2. Whisk the flour, baking powder, salt, and spices together in small bowl. 
  3. Brown the butter in a small saucepan and set aside to cool.
  4. Peel the apples, cut them in half and remove the cores. Cut the apples into 1-inch chunks.
  5. In a medium bowl, beat the eggs with a whisk until they’re foamy. Pour in the sugar and whisk for a minute or so to blend. Whisk in the vanilla and almond extract. 
  6. Add half of the flour to the egg mixture, and when it is incorporated, add half of the butter, followed by the rest of the flour and the remaining butter, mixing gently after each addition so that you have a smooth, rather thick batter. 
  7. Switch to a rubber spatula and fold in the apples, turning the fruit so that it's coated with batter.
  8. Slide the pan into the oven and bake for 50 minutes, or until the top of the cake is golden brown and a knife inserted deep into the center comes out clean; the cake may pull away from the sides of the pan. Transfer to a cooling rack and let rest for 5 minutes.
  9. Carefully run a blunt knife around the edges of the cake and remove the sides of the springform pan. (Open the springform slowly, and before it’s fully opened, make sure there aren't any apples stuck to it.) Allow the cake to cool until it is just slightly warm or at room temperature. Sprinkle with powdered sugar and enjoy.

Thursday, May 5, 2011

simple parisian lemon macarons


I've been known to get a little...excited...about certain things in life.  Coffee, for example.  Nothing gets me excited like an amazing latte or tea or just plain old coffee.  Scones.  Oh, but we've already discussed that.  Regardless of these everpresent obsessions in my life, I've got a new one for you.  Macarons.  No, not those god awful coconut things.  Real. French. Macarons.  I've done my research on what makes them delicious.  Aside from actually sitting on a park bench in Paris overlooking the Rue de la Paix and enjoying a pistachio macaron from a real patisserie, I've been around the macaron block.


So, I finally did it.  Take a second and imagine me as Julie (a la Julie and Julia), and these macarons as boeuf bourguignon.  You now understand why I'm so excited that I finally made these.  I've tried before.  Unsucessfully to say the least.  But these little suckers came out fairly decently for my second try.  Although I did it without a scale (and virtually every recipe demands that you weigh the ingredients), I'd call this one an overall win.  The biggest tool you'll need for this project, however, my friends, is good old fashioned p-a-t-i-e-n-c-e.  But, I assure you, they are well worth the wait.  As are most things in life.


Simple Pairisian Lemon Macarons 
macaron recipe adapted from bon apetit; buttercream from yours truly

For the macarons:
2 cups powdered sugar
1 cup (lightly packed) sifted almond flour [I made this from scratch: see note below]
1/2 cup (scant) egg whites (from about 3 large eggs), aged 24-48 hours
2 tablespoons plus 1/2 teaspoon sugar
  1. Line 2 large baking sheets with silpat or parchment. 
  2. Sift powdered sugar and almond flour into large bowl. 
  3. Using electric mixer, beat egg whites, sugar, and pinch of salt in medium bowl until medium peaks form. 
  4. Add egg white mixture to almond mixture; fold to incorporate. 
  5. Fill pastry bag fitted with 1/4-inch-diameter plain pastry tip with batter (batter will be thin and will drip from bag). Pipe batter in 11/4-inch rounds on baking sheets, spacing 1 inch apart (cookies will spread slightly). Let rest on sheets at room temperature 20 minutes.
  6. Position 1 rack in top third and 1 rack in bottom third of oven; preheat to 375°F. Bake cookies 5 minutes. 
  7. Reduce oven temperature to 325°F. Continue to bake cookies until puffed and golden on top, about 10 minutes, reversing sheets after 5 minutes. 
  8. Cool cookies on sheets on rack. Carefully peel cookies from parchment. 
For the lemon buttercream:
2 cups powdered sugar
1/2 cup unsalted butter, softened
1 teaspoon vanilla extract
2 teaspoons fresh lemon zest
  1. Beat all ingredients together on stand mixer until smooth, about 4 minutes.
  2. Assemble cookies by piping dime-sized ball of frosting onto one cookie and gently place equal shaped cookie on top.
  3. Let cookies rest at room temperature for about 45 minutes to harden before serving.
To make almond flour:
1-2 cups natural raw almonds
  1. Blanch almonds in boiling water for 30 seconds, just until the skins begin to prune.
  2. Remove from water, strain, and place on paper towel to dry.
  3. Grasp almond between your thumb and forefinger at the pointy tip of the almond and squeeze gently.  The almond should slide right out.
  4. Repeat until all almonds are skinned. Discard skins.
  5. Place almonds in food processor and ground them for about 4-5 minutes.  You want your flour to be as fine as possible.
  6. Remove flour from food processor and sift into a large bowl.  There will be grounds that will not filter through the sifter; take these and place back in food processor and grind again.  Do not keep any large bits that don't sift through the sifter. 
Makes approximately 24 macarons.

Thursday, April 21, 2011

blueberry brown oat cookies


Its pretty well known that I love cookies.  But do you also know how much I love blueberries?  And because summer is creeping up slowly, my obsession is only going to become even more prevalent.  Beware.  I'll put blueberries on anything.  Protein shakes, pancakes, toast, cereal...you name it, if I've got blueberries, they'll be in my every meal.


So when I randomly picked up the blueberry version of Craisins the other night at the grocery store (don't ask why, I couldn't tell you) I have been thinking about these things ever since.  Scones?  Been there.  Muffins?  Not the biggest muffin fan.  Cookies?  Hmm...I'm intrigued.  Could I finally have a chance to try my hand at a whole wheat cookie and make it a hearty little bugger?


Ladies and gentlemen, I think we have ourselves a kitchen success.  Pretty good sendoff to this treacherous kitchen, if you ask me.  The combination of the whole wheat flour, cinnamon, oats, and brown butter make this a very tasty little thing.  And oddly enough, since I ran out of granulated sugar, I only used brown sugar [hence the name - I'm quite clever, I know.]  But honestly, I think it really enhances the nuttiness of the brown butter and the overall heartiness of the cookie.  Adding walnuts would probably also be a great idea; I just didn't feel like it at the time.  But please let me know if you do!


Blueberry Brown Oat Cookies
recipe from yours truly


1 cup whole wheat flour
1/2 cup all-purpose flour
1/2 cup oats
3/4 teaspoon cinnamon
3/4 teaspoon baking powder
1/4 teaspoon baking soda
1/4 teaspoon salt
1/4 cup (1 stick) unsalted butter
1 cup brown sugar
1 egg
1 teaspoon vanilla
3/4 cup dried blueberries
1/4 cup walnuts, chopped (optional)

  1. Preheat oven to 350 degrees.
  2. Brown butter in medium saucepan, about 7 minutes, until foam is gone and brown specks appear.
  3. Place brown sugar in a large mixing bowl, and once butter is browned, immediately pour over sugar.  Let butter cool into sugar for about 10 minutes.
  4. Meanwhile, combine flours, oats, cinnamon, salt, baking powder, and baking soda in a small mixing bowl and mix well.
  5. Once butter is cooled, add egg and beat until well incorporated.  Add vanilla.
  6. Add half of the flour mixture to the wet ingredients, stirring thoroughly but not too much, until just incorporated. Add the other half of flour mixture, following same technique. Dough should be sticky and not at all runny—if it is, add more all-purpose flour, one tablespoon at a time, until dough is thick and drier.
  7. Gently stir in blueberries and walnuts, if desired, until well distributed, and place in the refrigerator to cool, about 10 minutes.
  8. Spoon dough onto a parchment-paper lined baking sheet, about 1 inch in diameter and somewhat rounded. Bake for approximately 8 minutes, or until cookies appear brown on edges and small bubbles appear in the middle.
Makes about one dozen cookies. Recipe is easily doubled.

Wednesday, April 20, 2011

ice cream cone cupcakes


Do you know how much I love birthdays?  Do you?  Because it'd be pretty hard not to notice.  It'd also be pretty hard to match my enthusiasm.


Enter cupcake cones.


I asked my sister a while back if I could have the honor of baking my precious nephew's cake for his 2nd (!) birthday party this past weekend, and luckily, I was dubbed Queen Cupcake.  No, really.  Aidan has officially come to associate me with cake.  He'll ask me to pick him up, walk me to the counter where these bad boys were sitting, and say in his ever-so-sweet tone, "caaaaaaaake?"


Yeah, that's my nephew.  Should also be no surprise that I'm posting this specifically on my precious his actual birthday - Happy Birthday to you, Aidan Thomas!]

So when I was deciding which cake recipe to try, I wanted to challenge myself.  Bobby's recipe was great that one time, and definitely a different technique than what I was used to, but I wanted to aim even higher.  Cooks Illustrated level.  And man, did that pay off.  This cake is amazing.  So flavorful, perfect amount of moistness (even baked in the cones), and last but not least, fun to make.  I'll make this again in a heart beat!  Unfortunately, I can't take all of the credit for the ice cream cones idea - neither of us can tell you where, or when, but sometime in our childhood, Erin and I had these.  So naturally, I had to recreate them for my nephew.  Purely selfless, if you ask me.  Regardless, these turned out wonderfully.  Try them at your next birthday party - they won't be forgotten!


Ice Cream Cone Cupcakes
Cupcake recipe adapted from Cooks Illustrated; frosting recipe from yours truly

2 1/4 cups cake flour (9 ounces), plus more for dusting the pans
1 cup whole milk, at room temperature
6 large egg whites (3/4 cup), at room temperature
2 teaspoons almond extract
1 teaspoon vanilla extract
1 3/4 cups granulated sugar (12 1/4 ounces)
4 teaspoons baking powder
1 teaspoon table salt
12 tablespoons unsalted butter (1 1/2 sticks), softened but still cool

48 cake ice cream cones
Two servings of your favorite frosting [I doubled my tried and true buttercream recipe]
  1. Set oven rack in middle position. (If oven is too small to cook both layers on a single rack, set racks in upper-middle and lower-middle positions.) Heat oven to 350 degrees. Place ice cream cones in cupcake pan liners and set aside. 
  2. Pour milk, egg whites, and extracts into small bowl, and mix with fork until blended. 
  3. Mix cake flour, sugar, baking powder, and salt in bowl of electric mixer at slow speed. Add butter; continue beating at slow speed until mixture resembles moist crumbs, with no powdery streaks remaining. 
  4. Add all but 1/2 cup of milk mixture to crumbs and beat at medium speed (or high speed if using handheld mixer) for 1 1/2 minutes. Add remaining 1/2 cup of milk mixture and beat 30 seconds more. Stop mixer and scrape sides of bowl. Return mixer to medium (or high) speed and beat 20 seconds longer. 
  5. Fill cones about 3/4 of the way, about halfway up the top inch of the cone. Bake until thin skewer or toothpick inserted in the center comes out clean, about 23 to 25 minutes. 
  6. Let cakes rest in cones and pan for 3 minutes. Gently remove cones from pan and set aside.  Since the cones don't get too hot, it's okay to place them on the counter. Let cool completely, about 1 1/2 hours, and then frost with your favorite frosting.

Saturday, March 19, 2011

funfetti cupcakes [for two]


So, if you thought that all I made for Katie was a measly cookie sandwich, you underestimate me immensely.  As amazing as the Chocolate Chip Whoopie was, is it really a birthday without cupcakes?  No way, Jose.  The only problem was, Katie left for California bright and early this morning, and since my garbage disposal boyfriend is out of town, there was no way I wanted to make a whole batch of cupcakes.  So when I saw this post on my favorite blog this past week, I knew it was a sign.  


Jessica is my separated twin; I am certain of it.  Her every recipe and thought is my dream recipe and thought.  It's true.  Fate had us at our blogs.  This recipe is so easy, so quick, and so tasty!  I love that it all comes together in one bowl, which allowed me to whip these up fresh first thing in the morning before Katie and I went on with our day.  The only thing that I modified was adding sprinkles to make them funfetti - it's yet another tradition of Katie's and mine to make funfetti cupcakes, and not to mention, not too hard to just throw in a bunch of sprinkles to some cake batter.  And besides, I know Jessica would never discourage the addition of sprinkles to anything.  They don't call it funfetti for nothin'.


I couldn't have asked for a better recipe!  Jessica didn't specify the type of flour, so I used cake flour since I like my cakes very moist and airy.  But, since I only own giant muffin pans (insert joke here), these came out flatter than what you would normally get, but they were still great.  And you can see that I yielded one extra little guy since I was afraid of my normal-sized cupcake liners capsizing in the sea of the giant cupcake mold in the oven.  So give me a little leeway on the logistics here, people.


Although I had just tried my hand at the best frosting ever (also recommended by Jessica), I frosted these with a basic buttercream.  Perhaps next time I'll switch it up and see how the tastes pair.  There we go!  Another hypothesis to test.


Funfetti Cupcakes [for two]
Recipe adapted from Jessica at How Sweet It Is; frosting recipe from yours truly


1 egg white
2 tablespoons sugar
2 tablespoons melted butter
1 teaspoon vanilla
1/3 cup cake flour
1/4 heaping teaspoon baking powder
pinch of salt
1 1/2 tablespoons milk

  1. Preheat oven to 350 degrees.  Line cupcake pan with 2 liners.
  2. In a small bowl, whisk together egg white and sugar until well incorporated.  Add in vanilla and melted butter and whisk to mix.
  3. Add flour, baking powder, and salt and stir until smooth. Batter should be quite thick.  Gently stir in milk.
  4. Pour batter into cupcake liners, making sure to evenly divide batter.  Bake for 10 minutes until toothpick comes out clean.
  5. Let cupcakes cool completely before frosting.
Frosting:
1/2 cup butter, softened
1 teaspoon vanilla
2 cups powdered sugar
2 tablespoons milk
  1. Combine butter, vanilla, and powdered sugar in a medium bowl and beat until soft and whipped in texture.
  2. Add milk slowly and continue beating for 2 minutes until desired texture is formed.
  3. Add frosting to pastry bag and frost cupcakes, once cooled, and top with sprinkles.